Microstructure Maps – The CellData Group
The main focus of the Pymicro package is to provide tools to study the microstructure-properties relationship for polycrystalline materials. This work naturally involves working from a description of the microstructure of the studied material samples. These descriptions are generally microstructural images, that can be:
outputs of real imaging experiments (DCT, CT, EBSD …)
digitally generated microstructure images (Voronoi tesselations, outputs from softwares like Neper, DREAM3D …)
outputs of numerical simulations techniques that provide images (such as FFT-based solvers)
They can be bi-dimensional or tri-dimensional, and usually are maps of the material phases or crystal orientation. This tutorial will review how to store, load and process microstructure images of a material with Pymicro and the Microstructure class.
The data model of the Microstructure class includes a specific Group to store microstructure images, the CellData group.
The CellData Group
The CellData group is an Image Group (see dedicated tutorial), i.e. a group designed to store several images of the same dimension. The CellData group aim is to store on the same grid images of the studied microstructure from various modalities (for instance, EBSD and SEM images), to allow for simultaneous visualization and cross processing of these data.
Note that you can directly benefit from 3D visualization of the CellData group content by using the Paraview software: an XDMF file for your dataset is automatically generated if you close your microstructure, that you can directly open it with the Paraview software. Alternatively, you can use the pause_for_visualization method to do it from your interactive Python interpreter. More details on these functionalities, please refer to this tutorial.
One of Pymicro’s example datasets will be used to illustrate the CellData content, let’s start by opening it with the Microstructure class and display the content of this group:
[1]:
import os
from pymicro import get_examples_data_dir # import file directory path
PYMICRO_EXAMPLES_DATA_DIR=get_examples_data_dir() # get file directory path
# import Microstructure class
from pymicro.crystal.microstructure import Microstructure
micro = Microstructure(filename=os.path.join(PYMICRO_EXAMPLES_DATA_DIR,'t5_dct_slice_data.h5'))

# display CellData group content
micro.print_node_info('CellData')
micro.print_group_content('CellData', short=True)
Downloading https://raw.githubusercontent.com/heprom/pymicro-data/main/inventory.txt to /home/docs/.pymicro_data/inventory.txt
Downloading https://raw.githubusercontent.com/heprom/pymicro-data/main/2-6-2_30k00_c1_masked-labels.raw to /home/docs/.pymicro_data/2-6-2_30k00_c1_masked-labels.raw
Downloading https://raw.githubusercontent.com/heprom/pymicro-data/main/2-6-2_30k00_c1_masked-labels.raw.info to /home/docs/.pymicro_data/2-6-2_30k00_c1_masked-labels.raw.info
Downloading https://raw.githubusercontent.com/heprom/pymicro-data/main/CT10_PROPAG100.geof to /home/docs/.pymicro_data/CT10_PROPAG100.geof
Downloading https://raw.githubusercontent.com/heprom/pymicro-data/main/CT10_PROPAG100.integ to /home/docs/.pymicro_data/CT10_PROPAG100.integ
Downloading https://raw.githubusercontent.com/heprom/pymicro-data/main/CT10_PROPAG100.node to /home/docs/.pymicro_data/CT10_PROPAG100.node
Downloading https://raw.githubusercontent.com/heprom/pymicro-data/main/CT10_PROPAG100.ut to /home/docs/.pymicro_data/CT10_PROPAG100.ut
Downloading https://raw.githubusercontent.com/heprom/pymicro-data/main/CT10_PROPAG100.vtu to /home/docs/.pymicro_data/CT10_PROPAG100.vtu
Downloading https://raw.githubusercontent.com/heprom/pymicro-data/main/Cu_111.dat to /home/docs/.pymicro_data/Cu_111.dat
Downloading https://raw.githubusercontent.com/heprom/pymicro-data/main/Cu_200.dat to /home/docs/.pymicro_data/Cu_200.dat
Downloading https://raw.githubusercontent.com/heprom/pymicro-data/main/EBSD_20grains.txt to /home/docs/.pymicro_data/EBSD_20grains.txt
Downloading https://raw.githubusercontent.com/heprom/pymicro-data/main/LICENSE to /home/docs/.pymicro_data/LICENSE
Downloading https://raw.githubusercontent.com/heprom/pymicro-data/main/R_1g.dat to /home/docs/.pymicro_data/R_1g.dat
Downloading https://raw.githubusercontent.com/heprom/pymicro-data/main/Ti64-200x200.ang to /home/docs/.pymicro_data/Ti64-200x200.ang
Downloading https://raw.githubusercontent.com/heprom/pymicro-data/main/Ti64-200x200_data.h5 to /home/docs/.pymicro_data/Ti64-200x200_data.h5
Downloading https://raw.githubusercontent.com/heprom/pymicro-data/main/Ti_ebsd_demo_data.h5 to /home/docs/.pymicro_data/Ti_ebsd_demo_data.h5
Downloading https://raw.githubusercontent.com/heprom/pymicro-data/main/Ti_ebsd_demo_data.xdmf to /home/docs/.pymicro_data/Ti_ebsd_demo_data.xdmf
Downloading https://raw.githubusercontent.com/heprom/pymicro-data/main/c1_exptime_air_5.raw to /home/docs/.pymicro_data/c1_exptime_air_5.raw
Downloading https://raw.githubusercontent.com/heprom/pymicro-data/main/c1_exptime_bgair_5.raw to /home/docs/.pymicro_data/c1_exptime_bgair_5.raw
Downloading https://raw.githubusercontent.com/heprom/pymicro-data/main/calcul.inp to /home/docs/.pymicro_data/calcul.inp
Downloading https://raw.githubusercontent.com/heprom/pymicro-data/main/calcul.integ to /home/docs/.pymicro_data/calcul.integ
Downloading https://raw.githubusercontent.com/heprom/pymicro-data/main/calcul.node to /home/docs/.pymicro_data/calcul.node
Downloading https://raw.githubusercontent.com/heprom/pymicro-data/main/calcul.ut to /home/docs/.pymicro_data/calcul.ut
Downloading https://raw.githubusercontent.com/heprom/pymicro-data/main/cube_ref.geof to /home/docs/.pymicro_data/cube_ref.geof
Downloading https://raw.githubusercontent.com/heprom/pymicro-data/main/ebsd_ti_beta_crack.osc to /home/docs/.pymicro_data/ebsd_ti_beta_crack.osc
Downloading https://raw.githubusercontent.com/heprom/pymicro-data/main/example_microstructure.tar.gz to /home/docs/.pymicro_data/example_microstructure.tar.gz
Downloading https://raw.githubusercontent.com/heprom/pymicro-data/main/grain1_112x112x121_uint8.raw to /home/docs/.pymicro_data/grain1_112x112x121_uint8.raw
Downloading https://raw.githubusercontent.com/heprom/pymicro-data/main/m1_data.h5 to /home/docs/.pymicro_data/m1_data.h5
Downloading https://raw.githubusercontent.com/heprom/pymicro-data/main/m1_data.xdmf to /home/docs/.pymicro_data/m1_data.xdmf
Downloading https://raw.githubusercontent.com/heprom/pymicro-data/main/m2_data.h5 to /home/docs/.pymicro_data/m2_data.h5
Downloading https://raw.githubusercontent.com/heprom/pymicro-data/main/m2_data.xdmf to /home/docs/.pymicro_data/m2_data.xdmf
Downloading https://raw.githubusercontent.com/heprom/pymicro-data/main/mousse_250x250x250_uint8.raw to /home/docs/.pymicro_data/mousse_250x250x250_uint8.raw
Downloading https://raw.githubusercontent.com/heprom/pymicro-data/main/n100-id1.ori-plain to /home/docs/.pymicro_data/n100-id1.ori-plain
Downloading https://raw.githubusercontent.com/heprom/pymicro-data/main/n100-id1.tesr to /home/docs/.pymicro_data/n100-id1.tesr
Downloading https://raw.githubusercontent.com/heprom/pymicro-data/main/n27-id1_data.h5 to /home/docs/.pymicro_data/n27-id1_data.h5
Downloading https://raw.githubusercontent.com/heprom/pymicro-data/main/n27-id1_data.xdmf to /home/docs/.pymicro_data/n27-id1_data.xdmf
Downloading https://raw.githubusercontent.com/heprom/pymicro-data/main/orientation_set.inp to /home/docs/.pymicro_data/orientation_set.inp
Downloading https://raw.githubusercontent.com/heprom/pymicro-data/main/pa6_teg11_e_crop.raw to /home/docs/.pymicro_data/pa6_teg11_e_crop.raw
Downloading https://raw.githubusercontent.com/heprom/pymicro-data/main/pa6_teg11_e_crop.raw.info to /home/docs/.pymicro_data/pa6_teg11_e_crop.raw.info
Downloading https://raw.githubusercontent.com/heprom/pymicro-data/main/peaks_3dxrd.map to /home/docs/.pymicro_data/peaks_3dxrd.map
Downloading https://raw.githubusercontent.com/heprom/pymicro-data/main/poly.geof to /home/docs/.pymicro_data/poly.geof
Downloading https://raw.githubusercontent.com/heprom/pymicro-data/main/pp100 to /home/docs/.pymicro_data/pp100
Downloading https://raw.githubusercontent.com/heprom/pymicro-data/main/pure_Ti_216x216x141_uint16.raw to /home/docs/.pymicro_data/pure_Ti_216x216x141_uint16.raw
Downloading https://raw.githubusercontent.com/heprom/pymicro-data/main/pure_Ti_216x216x141_uint16.raw.info to /home/docs/.pymicro_data/pure_Ti_216x216x141_uint16.raw.info
Downloading https://raw.githubusercontent.com/heprom/pymicro-data/main/rods.npy to /home/docs/.pymicro_data/rods.npy
Downloading https://raw.githubusercontent.com/heprom/pymicro-data/main/sam8_dct0_cen_full0000.edf to /home/docs/.pymicro_data/sam8_dct0_cen_full0000.edf
Downloading https://raw.githubusercontent.com/heprom/pymicro-data/main/sand_200x200x100_uint8.raw to /home/docs/.pymicro_data/sand_200x200x100_uint8.raw
Downloading https://raw.githubusercontent.com/heprom/pymicro-data/main/scan_138.raw to /home/docs/.pymicro_data/scan_138.raw
Downloading https://raw.githubusercontent.com/heprom/pymicro-data/main/steel_431x431x246_uint8.raw to /home/docs/.pymicro_data/steel_431x431x246_uint8.raw
Downloading https://raw.githubusercontent.com/heprom/pymicro-data/main/steel_431x431x246_uint8.raw.info to /home/docs/.pymicro_data/steel_431x431x246_uint8.raw.info
Downloading https://raw.githubusercontent.com/heprom/pymicro-data/main/steel_bin_431x431x246_uint8.raw to /home/docs/.pymicro_data/steel_bin_431x431x246_uint8.raw
Downloading https://raw.githubusercontent.com/heprom/pymicro-data/main/steel_bin_431x431x246_uint8.raw.info to /home/docs/.pymicro_data/steel_bin_431x431x246_uint8.raw.info
Downloading https://raw.githubusercontent.com/heprom/pymicro-data/main/strain_avg_per_grain.dat to /home/docs/.pymicro_data/strain_avg_per_grain.dat
Downloading https://raw.githubusercontent.com/heprom/pymicro-data/main/t5_dct_cen_index.mat to /home/docs/.pymicro_data/t5_dct_cen_index.mat
Downloading https://raw.githubusercontent.com/heprom/pymicro-data/main/t5_dct_slice.h5 to /home/docs/.pymicro_data/t5_dct_slice.h5
Downloading https://raw.githubusercontent.com/heprom/pymicro-data/main/t5_dct_slice_data.h5 to /home/docs/.pymicro_data/t5_dct_slice_data.h5
Downloading https://raw.githubusercontent.com/heprom/pymicro-data/main/t5_dct_slice_data.xdmf to /home/docs/.pymicro_data/t5_dct_slice_data.xdmf
Downloading https://raw.githubusercontent.com/heprom/pymicro-data/main/test_sampledata_ref.h5 to /home/docs/.pymicro_data/test_sampledata_ref.h5
Downloading https://raw.githubusercontent.com/heprom/pymicro-data/main/test_sampledata_ref.xdmf to /home/docs/.pymicro_data/test_sampledata_ref.xdmf
Downloading https://raw.githubusercontent.com/heprom/pymicro-data/main/test_sampledata_reference.xdmf to /home/docs/.pymicro_data/test_sampledata_reference.xdmf
Downloading https://raw.githubusercontent.com/heprom/pymicro-data/main/ti.mat to /home/docs/.pymicro_data/ti.mat

 GROUP CellData
=====================
 -- Parent Group : /
 -- Group attributes :
         * active_grain_map : grain_map
         * active_phase_map : phase_map
         * description :
         * dimension : (654, 654, 1)
         * empty : False
         * group_type : 3DImage
         * nodes_dimension : [655 655   2]
         * origin : [0. 0. 0.]
         * spacing : [0.0014 0.0014 0.0014]
         * xdmf_geometry_path : Domain/Grid/Geometry
         * xdmf_path : Domain/Grid
         * xdmf_topology_path : Domain/Grid/Topology
 -- Childrens : grain_map, mask, phase_map,
----------------

     --NODE grain_map: /CellData/grain_map (None) (   15.072 Kb)
     --NODE mask: /CellData/mask (None) (    4.714 Kb)
     --NODE phase_map: /CellData/phase_map (None - empty) (   64.000 Kb)
Let us now open the dataset and display the content of the group, using the Microstructure class:
This dataset CellData group contains a 3D image of \(654x654x1\) voxels, with a resolution of \(0.0014\) mm, that has 3 fields: grain_map, mask andphase_map. The microstructure image is actually a 3D image. It is stored as a 3D image as the dataset has been created by extracting a slice of a 3D microstructure dataset.
These three fields are part of the standard data model of the Microstructure datasets:
mask: a field describing the geometry of the sample. It has a 1 value inside the sample, and a 0 value outside the sample (typically, segmented X-ray Contrast Tomography outputs can be used as Microstructure mask).phase_map: a field indicating for each pixel/voxel the ID of the phase in which it is located. In areas of the Image that are not part of the material sample, the grain_map field takes a zero or negative value.grain_map: a field indicating for each pixel/voxel the ID of the grain in which it is located. In areas of the Image that are not part of the material sample, the grain_map field takes a zero or negative value.
The phase_map is empty here. The microstructure only has 1 phase, so this field is not usefull for this dataset.
Note
The length unit for Pymicro CellData image is millimeters (mm).
The grain_map, mask andphase_map arrays are essential for the Microstructure: a wide range of data processing methods can be applied to these arrays, or rely on their values. For instance, they are used to compute statistics of the grains morphology, provide various visualizations of the microstructure, merge two different microstructures into one dataset, create inputs for simulation softwares… Many examples can be found in the documentation tutorials, Cookbook and Examples.
Get CellData array values
To retrieve these arrays, you can used dedicated methods of the Microstructure class…
[2]:
# import Numpy to process arrays
import numpy as np

# get arrays in CellData group
mask = micro.get_mask()
phase_map = micro.get_phase_map()
grain_map = micro.get_grain_map()

print(f'List of values in the mask:\n {np.unique(mask)}\n')
print(f'List of values in the phase map:\n {np.unique(phase_map)}\n')
print(f'List of values in the grain map:\n {np.unique(grain_map)}\n')

print(f'Number of grains in the grain map: {len(np.unique(grain_map))}')
List of values in the mask:
 [0 1]

List of values in the phase map:
 [None]

List of values in the grain map:
 [  0   1   3   5   6   7   9  10  14  16  17  18  22  25  32  37  40  51
  52  98 115 124]

Number of grains in the grain map: 22
…or using the features of the SampleData class (see dedicated tutorial) to retrieve data:
[3]:
# attribute like access
mask2 = micro.mask
print(f'Attribute like access test : {np.all(mask2 == mask)}')

# dictionary like access
grain_map2 = micro['grain_map']
print(f'Dictionary like access test : {np.all(grain_map2 == grain_map)}')
Attribute like access test : True
Dictionary like access test : True
Visualization : View Slice method
The Microstructure class provides the view_slice method to plot a slice of the microstructure (the whole image if it is a 2D microstructure) using the grain_map and mask arrays:
[4]:
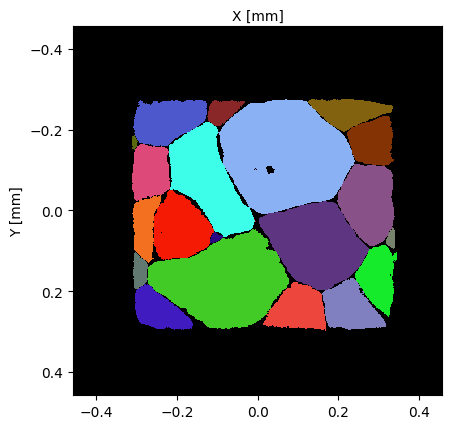
micro.view_slice()
[4]:
(<Figure size 640x480 with 1 Axes>, <Axes: xlabel='X [mm]', ylabel='Y [mm]'>)
When no optional argument is provided, the method plots the middle \((X,Y)\)-wise slice of the sample grain map, with a random color map for the grain ids, and shows the mask in red on the foreground in transparency mode. The image reveals colored areas that indicate the different grains in the material sample? The mask (in red) reveals the geometry of the sample associated to the dataset.
The optional arguments of the method are:
plane: the plane along which the slice is cut, must be one of ‘XY’, ‘YZ’ or ‘XZ’slice: the slice index in the arrays of theCellDatagroup. ‘YZ’ andslice=10would plotCellDataField[10,:,:]color: a string to chose the colormap from (random,grain_ids,schmid: Schmid factors,ipf: Inverse pole figure)show_mask: a flag to show the mask by transparency.show_grain_ids: a flag to annotate the plot with the grain ids.highlight_ids: a list of grain ids to restrict the annotations (by default all grains are annotated).slip_system: an instance (or a list of instances) of the class SlipSystem to compute the Schmid factor.axis: the unit vector for the load direction to compute the Schmid factor or to display IPF coloring.show_slip_traces: activate slip traces plot in each grain.hkl_planes: the list of planes to plot the slip traces.unit: switch between mm and pixel units.show_gb: show the grain boundaries, works only with color=’ipf’ for now.display: if True, the show method is called, otherwise, the figure is simply returned.
Let’s some more advanced examples of the visualization possibilities:
[5]:
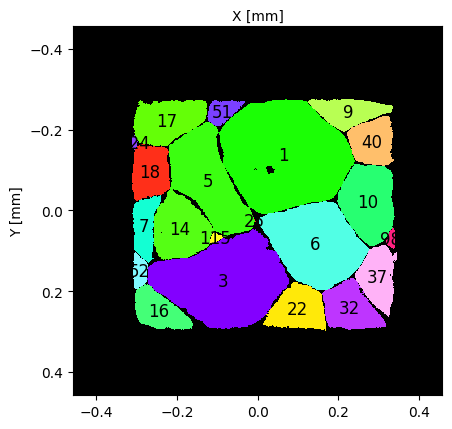
# plot Inverse pole figure map of the microstructure and show grain ids + set scale to millimeters
micro.view_slice(show_mask=False, show_grain_ids=True, color='ipf', unit='mm')
[5]:
(<Figure size 640x480 with 1 Axes>, <Axes: xlabel='X [mm]', ylabel='Y [mm]'>)
[6]:
# plot Schmid factor map of first basal slip system and show traces of all prismatic slip systems
#=============================================================================================
# get one basal slip system to compute its schmid factors and plot them on the slice
from pymicro.crystal.lattice import SlipSystem
lattice = micro.get_phase().get_lattice()
slip_system = lattice.get_slip_systems('basal')[1]

# get basal slip planes
plane_list = []
slip_system = lattice.get_slip_systems('prism')[0]
plane_list.append(slip_system.get_slip_plane())
slip_system = lattice.get_slip_systems('prism')[1]
plane_list.append(slip_system.get_slip_plane())
slip_system = lattice.get_slip_systems('prism')[2]
plane_list.append(slip_system.get_slip_plane())

# plot slice with schmid factor colormap
# set display to True to try reproducing the figure below !
micro.view_slice(color='schmid', slip_system=slip_system, show_mask=False, show_slip_traces=True, hkl_planes=plane_list)


# plot same slice with IPF colormap to better visualize slip traces
micro.view_slice(color='ipf', slip_system=slip_system, show_mask=False, show_slip_traces=True, hkl_planes=plane_list)


[6]:
(<Figure size 640x480 with 1 Axes>, <Axes: xlabel='X [mm]', ylabel='Y [mm]'>)
[7]:
del micro
Active Maps
In some situations, it may be relevant, to store several arrays for the same microstructural map. For instance, when reconstructing a microstructure from an imaging experiment, the raw imaging output is an important data item to store, but may be improved with some image processing. As a result, the dataset may contain more than one array that could be used as a grain_map or a phase_map.
The Microstructure class uses two attributes, active_grain_map and active_phase_map, to specify which array is to be used as the main grain_map or a phase_map for data processing. In practice, active_grain_map and active_grain_map are strings that indicated the name of the array to use, and:
the
get_grain_mapandget_phase_mapreturn theactive_grain_mapandactive_grain_maparrays.Microstructuremethods will use theactive_grain_mapandactive_grain_mapasgrain_mapor aphase_map. This will impact for instance theview_slicemethod presented above.
The dataset example_microstructure in Pymicro/examples contains several grain_maps. We will use it to illustrate how to use active maps.
[8]:
# Open dataset
#=============
dataset_file = os.path.join(PYMICRO_EXAMPLES_DATA_DIR, 'example_microstructure') # test dataset desired file path
tar_file = os.path.join(PYMICRO_EXAMPLES_DATA_DIR, 'example_microstructure.tar.gz') # dataset zipped archive path

# Save current directory
cwd = os.getcwd()
# move to example data directory
os.chdir(PYMICRO_EXAMPLES_DATA_DIR)
# unarchive the dataset
os.system(f'tar -xvf {tar_file}')
# get back to UserGuide directory
os.chdir(cwd)

# Open Microstructure dataset
micro = Microstructure(filename=dataset_file)

# print content of CellData group
micro.print_group_content('CellData', short=True)
example_microstructure.h5
example_microstructure.xdmf

(111,)
/GrainData/GrainDataTable (Table(111,)) ''
end of _init_phase, fixing phase array
[1 1 1 1 1 1 1 1 1 1 1 1 1 1 1 1 1 1 1 1 1 1 1 1 1 1 1 1 1 1 1 1 1 1 1 1 1
 1 1 1 1 1 1 1 1 1 1 1 1 1 1 1 1 1 1 1 1 1 1 1 1 1 1 1 1 1 1 1 1 1 1 1 1 1
 1 1 1 1 1 1 1 1 1 1 1 1 1 1 1 1 1 1 1 1 1 1 1 1 1 1 1 1 1 1 1 1 1 1 1 1 1]
    |--GROUP Amitex_output_fields: /CellData/Amitex_output_fields (Group)
     --NODE Field_index: /CellData/Field_index (string_array) (   63.999 Kb)
     --NODE grain_map: /CellData/grain_map (field_array) (    1.945 Mb)
     --NODE grain_map_raw: /CellData/grain_map_raw (field_array) (    1.945 Mb)
     --NODE mask: /CellData/mask (field_array) (  996.094 Kb)
     --NODE phase_map: /CellData/phase_map (field_array - empty) (   64.000 Kb)
     --NODE uncertainty_map: /CellData/uncertainty_map (field_array) (  996.094 Kb)
This dataset has been built from a synchrotron X-ray diffraction experiment, and store the processed and raw version of the reconstructed microstructure in the grain_map and grain_map_raw data items. The active grain map can be known from the class attribute:
[9]:
print(f'The active grain map is "{micro.active_grain_map}"')
The active grain map is "grain_map"
To set the value of the active grain map, you can use set_active_grain_map method:
[10]:
# get both grain maps arrays
grain_map = micro['grain_map']
grain_map_raw = micro['grain_map_raw']

# check class method return grain map
print(f'The active grain map is "{micro.active_grain_map}"')
print(f'Is the active grain map equal to "grain_map" array ? {np.all(grain_map == micro.get_grain_map())}')
print(f'Is the active grain map equal to "grain_map_raw" array ? {np.all(grain_map_raw == micro.get_grain_map())}\n')

# change grain map and redo the test
micro.set_active_grain_map('grain_map_raw')
print(f'The active grain map is "{micro.active_grain_map}"')
print(f'Is the active grain map equal to "grain_map" array ? {np.all(grain_map == micro.get_grain_map())}')
print(f'Is the active grain map equal to "grain_map_raw" array ? {np.all(grain_map_raw == micro.get_grain_map())}')
The active grain map is "grain_map"
Is the active grain map equal to "grain_map" array ? True
Is the active grain map equal to "grain_map_raw" array ? False

The active grain map is "grain_map_raw"
Is the active grain map equal to "grain_map" array ? False
Is the active grain map equal to "grain_map_raw" array ? True
As shown above, the get_grain_map method return the array that is named after the string stored in the active_grain_map attribute of the Microstructure class instance. For further illustration, we will see how it impacts visualization with the view_slice method:
[11]:
# set active grain map and visualize
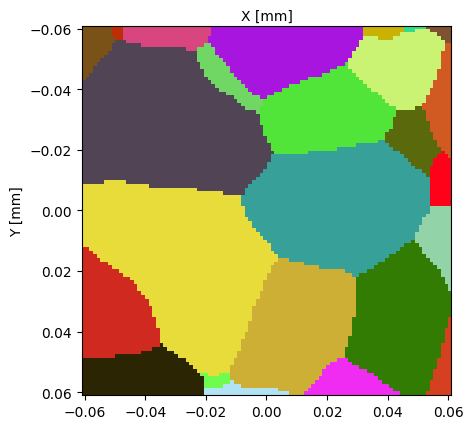
micro.set_active_grain_map('grain_map')
print(f'The active grain map is "{micro.active_grain_map}"')
micro.view_slice()
# set active grain map and visualize
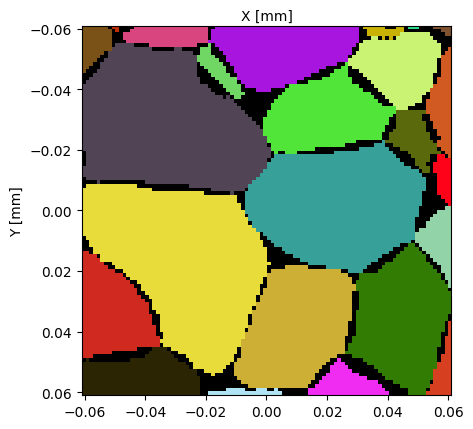
micro.set_active_grain_map('grain_map_raw')
print(f'The active grain map is "{micro.active_grain_map}"')
micro.view_slice()
The active grain map is "grain_map"

The active grain map is "grain_map_raw"

[11]:
(<Figure size 640x480 with 1 Axes>, <Axes: xlabel='X [mm]', ylabel='Y [mm]'>)
The grain_map_raw field is very similar to the grain_map field but contains empty regions around grain boundaries, that come from uncertainties in the microstructure reconstruction process from X-ray diffraction experiments. Several image processing steps have enable to fill these gaps and create a grain map with no empty regions, that can be used, for instance, as an input for numerical simulations.
Note
Note that the same mechanism allows to handle several the phase map fields, with the active_phase_map class attribute and set_active_phase_map method.
Add microstructure maps in datasets
To conclude this tutorial, we will see how to add data into the CellData group of a dataset. To set the values of the grain_map, mask andphase_map, you may use the set_mask , set_grain_map and set_phase_map methods of the Microstructure class:
[12]:
# create an empty Microstructure object
micro2 = Microstructure(filename='micro_test', autodelete=True)
# print content of phase data group
print('CellData group at dataset creation:')
micro2.print_node_info('CellData')

# get grain map from example dataset
micro.set_active_grain_map('grain_map')
grain_map = micro.get_grain_map()

# set grain map in new microstructure
micro2.set_grain_map(grain_map, voxel_size=micro.get_attribute('spacing','CellData')[0])

# print content of phase data group and visualize
print('CellData group after setting grain map:')
micro2.print_node_info('CellData')
micro2.view_slice()
0 phases found in the data set
new phase added: unknown
CellData group at dataset creation:

 GROUP CellData
=====================
 -- Parent Group : /
 -- Group attributes :
         * active_grain_map : grain_map
         * active_phase_map : phase_map
         * empty : True
         * group_type : emptyImage
 -- Childrens : grain_map, Field_index, phase_map, mask,
----------------


CellData group after setting grain map:

 GROUP CellData
=====================
 -- Parent Group : /
 -- Group attributes :
         * active_grain_map : grain_map
         * active_phase_map : phase_map
         * description :
         * dimension : [100 100 100]
         * empty : False
         * group_type : 3DImage
         * nodes_dimension : [101 101 101]
         * nodes_dimension_xdmf : [101 101 101]
         * origin : [0. 0. 0.]
         * spacing : [0.00122 0.00122 0.00122]
         * xdmf_gridname : CellData
 -- Childrens : Field_index, phase_map, mask, grain_map,
----------------
[12]:
(<Figure size 640x480 with 1 Axes>, <Axes: xlabel='X [mm]', ylabel='Y [mm]'>)
The CellData group is created empty in a new dataset. For this reason, the set_grain_map method requires that the user provides a voxel/pixel size for the image when adding the first microstructural map in the dataset.
The set_grain_map method can also be used to add a second grain map field, by using the map_name input argument. Its defaults value, "grain_map", leads to overwriting the current grain_map array stored in the dataset. Using a different value allows to create a new array in the CellData group, and automatically sets it as active grain map:
[13]:
# use set_grain_map to add raw grain map
micro2.set_grain_map(grain_map=micro['grain_map_raw'], map_name='grain_map_raw')
print(f'The active grain map is "{micro2.active_grain_map}"')
micro2.view_slice()
The active grain map is "grain_map_raw"
[13]:
(<Figure size 640x480 with 1 Axes>, <Axes: xlabel='X [mm]', ylabel='Y [mm]'>)
As an Image Group, you can also add fields to the CellData group with the SampleData method add_field:
[14]:
# add grain map raw into new microstructure
grain_map_raw = micro['grain_map_raw']
micro2.add_field(gridname='CellData', fieldname='grain_map_raw_2', array=grain_map_raw)

# print content of phase data group and visualize
print('CellData group after adding a second grain map raw array:')
micro2.print_node_info('CellData')
micro2.set_active_grain_map('grain_map_raw_2')
micro2.view_slice()
CellData group after adding a second grain map raw array:

 GROUP CellData
=====================
 -- Parent Group : /
 -- Group attributes :
         * active_grain_map : grain_map_raw
         * active_phase_map : phase_map
         * description :
         * dimension : [100 100 100]
         * empty : False
         * group_type : 3DImage
         * nodes_dimension : [101 101 101]
         * nodes_dimension_xdmf : [101 101 101]
         * origin : [0. 0. 0.]
         * spacing : [0.00122 0.00122 0.00122]
         * xdmf_gridname : CellData
 -- Childrens : Field_index, phase_map, mask, grain_map, grain_map_raw, grain_map_raw_2,
----------------

[14]:
(<Figure size 640x480 with 1 Axes>, <Axes: xlabel='X [mm]', ylabel='Y [mm]'>)
Note
Set the mask and phase_map field values in the same way as with the grain_map field, using the set_mask and set_phase_map methods.
This concludes the tutorial on Pymicro’s microstructural maps.
[15]:
del micro2
del micro
os.remove(dataset_file+'.h5')
os.remove(dataset_file+'.xdmf')
Microstructure Autodelete:
 Removing hdf5 file micro_test.h5